In this tutorial we will teach you how to create a graphical application with PyQT. You will need to install some packages:
|
1
2
3
4
|
sudo pip install pyqt
sudo apt-get install qt4-designer
sudo apt-get install pyqt4-dev-tools
sudo apt-get install python-kde4
|
If python-kde4 cannot be found update your repository to find it. If you are on Ubuntu use this link.
Now we can use the QT Designer application. It saves us from writing tons of layout code that you may be used to when writing HTML. Start qt4-designer from your applications menu. The QT Designer application will appear:

QT_Designer
Press Dialog without Buttons and press Create. You can now drag any component from the widget box to the form. Simple drag and drop. We added a button, label and a pixmap. (I took a random image from the web for the pixmap)
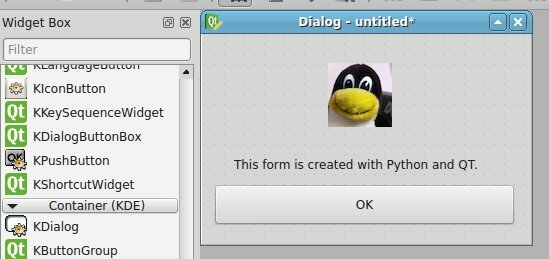
Our window looks like the image above. Press Form > Viewcode. We will get a popup box with the form code in… C++! That is great, but we want the Python code. Press File > Save as > form.ui.
The file test.ui contains your form described in XML format. (You can view it in a text editor) Open a console and type:
|
1
|
pyuic4 form.ui > form.py
|
Running the file does nothing. Create a new file called gui.py
Paste the code below:
|
1
2
3
4
5
6
7
8
9
10
11
12
13
14
15
16
|
import sys
from PyQt4 import QtCore, QtGui
from form import Ui_Dialog
class MyDialog(QtGui.QDialog):
def __init__(self, parent=None):
QtGui.QWidget.__init__(self, parent)
self.ui = Ui_Dialog()
self.ui.setupUi(self)
if __name__ == "__main__":
app = QtGui.QApplication(sys.argv)
myapp = MyDialog()
myapp.show()
sys.exit(app.exec_())
|
Run with:
|
1
|
python gui.py
|
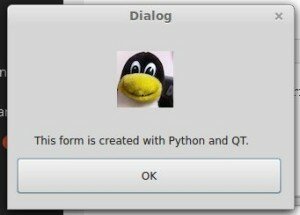
This will open our graphical interface. Pressing on the OK button will simply close the application.
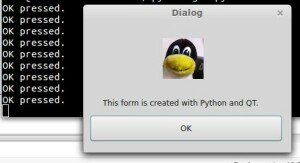
We want to add some action when the OK button is pressed. We add these three lines to the code:
|
1
2
3
4
|
self.ui.pushButton.clicked.connect(self.OK)
def OK(self):
print 'OK pressed.'
|
Please make sure your button is named pushButton by inspecting the form.py file. Pressing the button will print ‘OK pressed’ to the terminal.
Total application below:
gui.py
|
1
2
3
4
5
6
7
8
9
10
11
12
13
14
15
16
17
18
19
20
21
|
import sys
from PyQt4 import QtCore, QtGui
from form import Ui_Dialog
class MyDialog(QtGui.QDialog):
def __init__(self, parent=None):
QtGui.QWidget.__init__(self, parent)
self.ui = Ui_Dialog()
self.ui.setupUi(self)
self.ui.pushButton.clicked.connect(self.OK)
def OK(self):
print 'OK pressed.'
if __name__ == "__main__":
app = QtGui.QApplication(sys.argv)
myapp = MyDialog()
myapp.show()
sys.exit(app.exec_())
|
form.py (generated):
|
1
2
3
4
5
6
7
8
9
10
11
12
13
14
15
16
17
18
19
20
21
22
23
24
25
26
27
28
29
30
31
32
33
34
35
36
37
38
39
40
41
42
43
44
45
46
47
48
49
|
# -*- coding: utf-8 -*-
# Form implementation generated from reading ui file 'form.ui'
#
# Created: Mon Jan 26 01:18:19 2015
# by: PyQt4 UI code generator 4.10.4
#
# WARNING! All changes made in this file will be lost!
from PyQt4 import QtCore, QtGui
try:
_fromUtf8 = QtCore.QString.fromUtf8
except AttributeError:
def _fromUtf8(s):
return s
try:
_encoding = QtGui.QApplication.UnicodeUTF8
def _translate(context, text, disambig):
return QtGui.QApplication.translate(context, text, disambig, _encoding)
except AttributeError:
def _translate(context, text, disambig):
return QtGui.QApplication.translate(context, text, disambig)
class Ui_Dialog(object):
def setupUi(self, Dialog):
Dialog.setObjectName(_fromUtf8("Dialog"))
Dialog.resize(325, 208)
self.label = QtGui.QLabel(Dialog)
self.label.setGeometry(QtCore.QRect(30, 100, 341, 61))
self.label.setObjectName(_fromUtf8("label"))
self.pushButton = QtGui.QPushButton(Dialog)
self.pushButton.setGeometry(QtCore.QRect(10, 150, 301, 41))
self.pushButton.setObjectName(_fromUtf8("pushButton"))
self.kpixmapregionselectorwidget = KPixmapRegionSelectorWidget(Dialog)
self.kpixmapregionselectorwidget.setGeometry(QtCore.QRect(-30, -20, 371, 161))
self.kpixmapregionselectorwidget.setPixmap(QtGui.QPixmap(_fromUtf8("Desktop/IMG_0377.jpg")))
self.kpixmapregionselectorwidget.setObjectName(_fromUtf8("kpixmapregionselectorwidget"))
self.retranslateUi(Dialog)
QtCore.QMetaObject.connectSlotsByName(Dialog)
def retranslateUi(self, Dialog):
Dialog.setWindowTitle(_translate("Dialog", "Dialog", None))
self.label.setText(_translate("Dialog", "This form is created with Python and QT.", None))
self.pushButton.setText(_translate("Dialog", "OK", None))
from PyKDE4.kdeui import KPixmapRegionSelectorWidget
|