In this tutorial we will build a webbrowser with Python. We will use PyQT. Install the required packages:
|
1
2
3
4
|
sudo pip install python-qt4
sudo apt-get install qt4-designer
sudo apt-get install pyqt4-dev-tools
sudo apt-get install python-kde4
|
If you have not done our first tutorial, you could try it. If python-kde4 cannot be found update your repository to find it. If you are on Ubuntu or Debian Linux use this link.
Creating the UI with PyQT
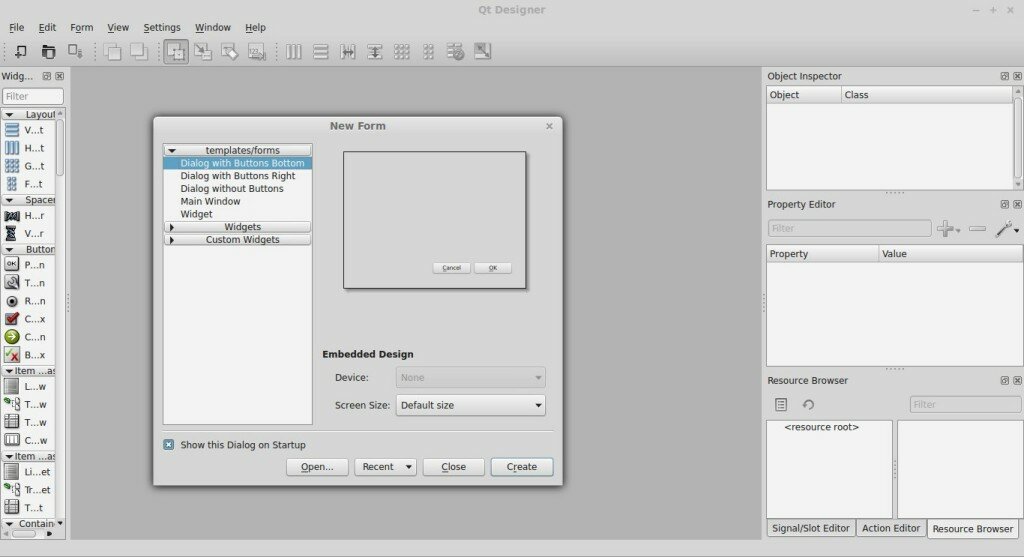
Start qt4-designer from your applications menu. The QT Designer application will appear:
Select Main Window and press Create. We now have our designer window open. Drag a KWebView component on the window. If you have a QtWebView in the component list. use that instead. We also add an Line Edit on top. Press File > Save As > browser.ui. Run the command:
|
1
|
pyuic4 browser.ui > browser.py
|
This will generate a Python file. Remove the line “from kwebview import KWebView” from the bottom of the browser.py file. Change KWebView to QtWebView. We want to use QtWebView instead. If you are lazy to change that, take the browser.py file from below.
Creating the logic.
Create a file called run.py with this contents:
|
1
2
3
4
5
6
7
8
9
10
11
12
13
14
15
16
17
18
19
20
21
22
23
24
25
26
|
import sys
from browser import BrowserDialog
from PyQt4 import QtCore, QtGui
from PyQt4.QtCore import QUrl
from PyQt4.QtWebKit import QWebView
class MyBrowser(QtGui.QDialog):
def __init__(self, parent=None):
QtGui.QWidget.__init__(self, parent)
QWebView.__init__(self)
self.ui = BrowserDialog()
self.ui.setupUi(self)
self.ui.lineEdit.returnPressed.connect(self.loadURL)
def loadURL(self):
url = self.ui.lineEdit.text()
self.ui.qwebview.load(QUrl(url))
self.show()
#self.ui.lineEdit.setText("")
if __name__ == "__main__":
app = QtGui.QApplication(sys.argv)
myapp = MyBrowser()
myapp.ui.qwebview.load(QUrl('https://talkera.org/python'))
myapp.show()
sys.exit(app.exec_())
|
This code will use the UI as defined in browser.py and add logic to it. The lines
|
1
2
3
4
5
6
7
|
self.ui.lineEdit.returnPressed.connect(self.loadURL)
def loadURL(self):
url = self.ui.lineEdit.text()
self.ui.qwebview.load(QUrl(url))
self.show()
#self.ui.lineEdit.setText("")
|
The first line defines the callback or event. If a person presses enter (returnPressed), it will call the function loadURL. It makes sure that once you press enter, the page is loaded with that function. If you did everything correctly, you should be able to run the browser with the command:
|
1
|
python run.py
|
Please make sure you type the full url, e.g. : https://talkera.org including the http:// part. Your browser should now start:

If your code does not run, please use the codes below (or look at the differences and change whats wrong):
browser.py
|
1
2
3
4
5
6
7
8
9
10
11
12
13
14
15
16
17
18
19
20
21
22
23
24
25
26
27
28
29
30
31
32
33
34
35
36
37
38
39
40
41
42
43
44
45
|
# -*- coding: utf-8 -*-
# Form implementation generated from reading ui file 'browser.ui'
#
# Created: Fri Jan 30 20:49:32 2015
# by: PyQt4 UI code generator 4.10.4
#
# WARNING! All changes made in this file will be lost!
import sys
from PyQt4 import QtCore, QtGui
from PyQt4.QtGui import QApplication
from PyQt4.QtCore import QUrl
from PyQt4.QtWebKit import QWebView
try:
_fromUtf8 = QtCore.QString.fromUtf8
except AttributeError:
def _fromUtf8(s):
return s
try:
_encoding = QtGui.QApplication.UnicodeUTF8
def _translate(context, text, disambig):
return QtGui.QApplication.translate(context, text, disambig, _encoding)
except AttributeError:
def _translate(context, text, disambig):
return QtGui.QApplication.translate(context, text, disambig)
class BrowserDialog(object):
def setupUi(self, Dialog):
Dialog.setObjectName(_fromUtf8("Dialog"))
Dialog.resize(1024, 768)
self.qwebview = QWebView(Dialog)
self.qwebview.setGeometry(QtCore.QRect(0, 50, 1020, 711))
self.qwebview.setObjectName(_fromUtf8("kwebview"))
self.lineEdit = QtGui.QLineEdit(Dialog)
self.lineEdit.setGeometry(QtCore.QRect(10, 20, 1000, 25))
self.lineEdit.setObjectName(_fromUtf8("lineEdit"))
self.retranslateUi(Dialog)
QtCore.QMetaObject.connectSlotsByName(Dialog)
def retranslateUi(self, Dialog):
Dialog.setWindowTitle(_translate("Browser", "Browser", None))
|
run.py
|
1
2
3
4
5
6
7
8
9
10
11
12
13
14
15
16
17
18
19
20
21
22
23
24
25
26
|
import sys
from browser import BrowserDialog
from PyQt4 import QtCore, QtGui
from PyQt4.QtCore import QUrl
from PyQt4.QtWebKit import QWebView
class MyBrowser(QtGui.QDialog):
def __init__(self, parent=None):
QtGui.QWidget.__init__(self, parent)
QWebView.__init__(self)
self.ui = BrowserDialog()
self.ui.setupUi(self)
self.ui.lineEdit.returnPressed.connect(self.loadURL)
def loadURL(self):
url = self.ui.lineEdit.text()
self.ui.qwebview.load(QUrl(url))
self.show()
#self.ui.lineEdit.setText("")
if __name__ == "__main__":
app = QtGui.QApplication(sys.argv)
myapp = MyBrowser()
myapp.ui.qwebview.load(QUrl('https://talkera.org/python'))
myapp.show()
sys.exit(app.exec_())
|
